The manual is arranged to reflect the most likely way you would use Manticore:
- starting with basic information about it and how to install and connect
- essential things like adding documents and running searches
- performance optimization tips, tricks and extending Manticore with the help of plugins and custom functions
Key sections of the manual are marked with 1️⃣, 2️⃣, 3️⃣ etc. in the menu for your convenience since their corresponding functionality is most used. If you are new to Manticore we highly recommend not skipping them.
If you are looking for a quick understanding of how Manticore works in general ⚡ Quick start guide is a good place to start.
Each query example has a little icon 📋 in the top-right corner:
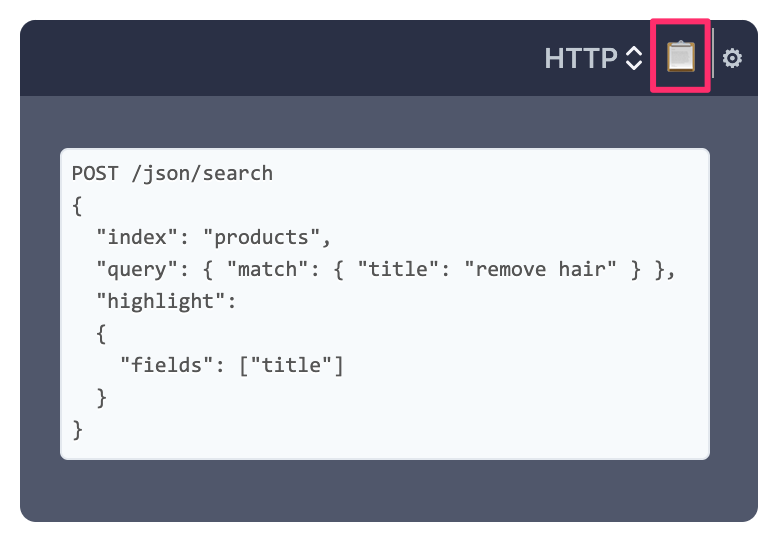
You can use it to copy examples to the clipboard. If the query is an HTTP request it will be copied as a CURL command. You can configure the host/port if you press ⚙️.
We love search and we've made our best to make searching in this manual as convenient as possible. Of course it's backed by Manticore Search. Besides using the search bar which requires opening the manual first there is a very easy way to find something by just opening mnt.cr/your-search-keyword :
There are few things you need to understand about Manticore Search that can help you follow the best practices of using it.
- Real-time table allows adding, updating and deleting documents with immediate availability of the changes.
- Plain table is a mostly immutable data structure and a basic element used by real-time tables. Plain table stores a set of documents, their common dictionary and indexation settings. One real-time table can consist of multiple plain tables (chunks), but besides that Manticore provides direct access to building plain tables using tool indexer. It makes sense when your data is mostly immutable, therefore you don't need a real-time table for that.
Manticore Search works in two modes:
- Real-time mode (RT mode). This is a default one and allows to manage your data schema imperatively:
- allows managing your data schema online using SQL commands
CREATE/ALTER/DROP TABLEand their equivalents in non-SQL clients - in the configuration file you need to define only server-related settings including data_dir
- allows managing your data schema online using SQL commands
- Plain mode allows to define your data schemas in a configuration file, i.e. provides declarative kind of schema management. It makes sense in three cases:
- when you only deal with plain tables
- or when your data schema is very stable and you don't need replication (as it's available only in the RT mode)
- when you have to make your data schema portable (e.g. for easier deployment of it on a new server)
You cannot combine the 2 modes and need to decide which one you want to follow by specifying data_dir in your configuration file (which is the default behaviour). If you are unsure our recommendation is to follow the RT mode as if even you need a plain table you can build it with a separate plain table config and import to your main Manticore instance.
Real-time tables can be used in both RT and plain modes. In the RT mode a real-time table is defined with a CREATE TABLE command, while in the plain mode it is defined in the configuration file. Plain (offline) tables are supported only in the plain mode. Plain tables cannot be created in the RT mode, but existing plain tables made in the plain mode can be converted to real-time tables and imported in the RT mode.
Manticore provides multiple ways and interfaces to manage your schemas and data, but the two main are:
- SQL. This is a native Manticore's language which enables all Manticore's functionality. The best practice is to use SQL to:
- manage your schemas and do other DBA routines as it's the easiest way to do that
- design your queries as SQL is much closer to natural language than the JSON DSL which is important when you design something new. You can use Manticore SQL via any MySQL client or /sql.
- JSON. Most functionality is also available via JSON domain specific language. This is especially useful when you integrate Manticore with your application as with JSON you can do it more programmatically than with SQL. The best practice is to first explore how to do something via SQL and then use JSON to integrate it into your application.
- RHEL, Centos, Alma, Amazon, Oracle, Debian, Ubuntu, Mint, MacOS
- Windows
- Docker
- Kubernetes
curl https://manticoresearch.com | shIf you are looking for separate packages, please find them here.
For more details on the installation on RPM-based linuxes, see here.
For more details on the installation on DEBIAN-based linuxes, see here.
Please find more details on the installation on macOS, see below.
For more details about quick installer, run
curl https://manticoresearch.com | sh -s help- Download the Manticore Search Installer and run it. Follow the installation instructions.
- Choose the directory to install to.
- Select the components you want to install. We recommend installing all of them.
- Manticore comes with a preconfigured
manticore.conffile in RT mode. No additional configuration is required.
For more details on the installation, see below.
One-liner for a sandbox (not recommended for production use):
docker run --name manticore --rm -d manticoresearch/manticore && echo "Waiting for Manticore docker to start. Consider mapping the data_dir to make it start faster next time" && until docker logs manticore 2>&1 | grep -q "accepting connections"; do sleep 1; echo -n .; done && echo && docker exec -it manticore mysql && docker stop manticoreThis runs Manticore container and waits for it to boot up. After starting, it launches a MySQL client session. When you exit the MySQL client, the Manticore container ceases operation and gets deleted, leaving no stored data behind. For details on how to utilize Manticore in a live production setting, refer to the following section.
For production use:
docker run --name manticore -v $(pwd)/data:/var/lib/manticore -p 127.0.0.1:9306:9306 -p 127.0.0.1:9308:9308 -d manticoresearch/manticoreThis setup will enable the Manticore Columnar Library and Manticore Buddy, and run Manticore on ports 9306 for MySQL connections and 9308 for all other connections, using ./data/ as the designated data directory.
Read more about production use in the documentation.
helm repo add manticoresearch https://helm.manticoresearch.com
# Update values.yaml if needed
helm install manticore -n manticore --create-namespace manticoresearch/manticoresearch
You can find more information about installing the Helm chart in the documentation.
Docker images of Manticore Search are publicly accessible on Docker Hub, built from the Manticore Search docker GitHub repository.
To retrieve the Manticore image, run the following command:
docker pull manticoresearch/manticoreFor more information about using Manticore in Docker, see the Using Manticore in Docker section.
- CentOS 8, RHEL 8, Oracle Linux 8, CentOS Stream 8
- Amazon Linux 2
- CentOS 9, RHEL 9, AlmaLinux 9
- AlmaLinux 10, other RHEL 10-based distributions
curl https://manticoresearch.com | shIf you prefer "Nightly" (development) versions do:
curl https://manticoresearch.com | sh -s devThe simplest method to install Manticore on RedHat/CentOS is by using our YUM repository:
Install the repository:
sudo yum install https://repo.manticoresearch.com/manticore-repo.noarch.rpmThen install Manticore Search:
sudo yum install manticoreIf you are upgrading to Manticore 6 or newer from an older version, it is recommended to remove your old packages first to avoid conflicts caused by the updated package structure:
sudo yum remove manticore*It won't remove your data and configuration file.
If you prefer "Nightly" (development) versions do:
sudo yum -y install https://repo.manticoresearch.com/manticore-dev-repo.noarch.rpm && \
sudo yum -y install manticoreTo download standalone RPM files from the Manticore repository, follow the instructions available at https://manticoresearch.com/install/.
If you plan to use indexer to create tables from external sources, you'll need to make sure you have installed corresponding client libraries in order to make available of indexing sources you want. The line below will install all of them at once; feel free to use it as is, or to reduce it to install only libraries you need (for only mysql sources - just mysql-libs should be enough, and unixODBC is not necessary).
sudo yum install mysql-libs postgresql-libs expat unixODBCIn CentOS Stream 8 you may need to run:
dnf install mariadb-connector-cif you get error sql_connect: MySQL source wasn't initialized. Wrong name in dlopen? trying to build a plain table from MySQL.